
This article includes the steps in configuring your Google analytics account so you will have the ability to track email conversions.
The Reasons Why You Have to do this
The primary reason of doing this is because it can determine right away the number of individuals that are subscribing to your email list, the rate of conversion for each page and where they come from. This information is very essential since it will helps you identify what is working, what is not and then carry out the necessary action. Definitely you can obtain this data in the backend of the majority of email marketing service firms. However it is not easy to access.
For instance, below is the snapshot of the email list data in Google Analytics for the previous month:
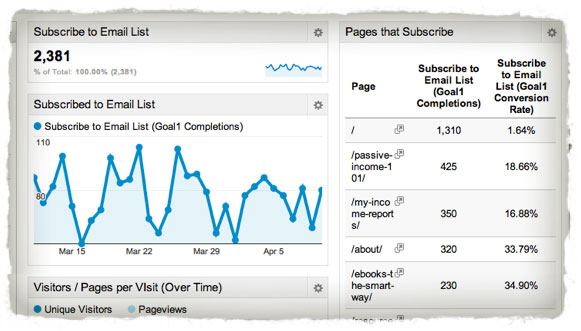
You can easily see that you have gathered 2381 subscribers and the one that got the most subscriptions are from the home page, the website getting started page, the about page and the income reports page while the one with the highest conversion rates are the about page and the eBook landing page. From here you will be able to test the different strategies and analyze how it will affect the conversion rates, or notice a specific date where email subscriptions were unusually high or low and investigate further.
Steps on Setting Up Email Conversion Tracking in Google Analytics
Approximately the process can be completed in less than one hour
Step 1: Build a “Confirmation Thank You Page”
Upon confirming your subscription, you will be redirected to the confirmation thank you page of the website. This is definitely an essential step since Google Analytics will only know that you subscribed once you have reached this page. From there, the tool has the ability to gather information from that particular visitor.
Your confirmation thank you page should include the following details:
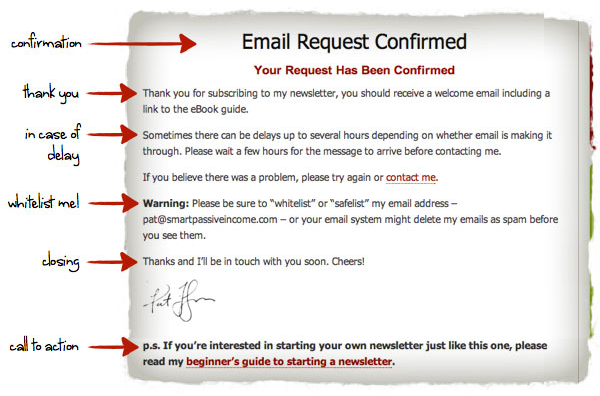
This is your chance to add a call to action since the subscriber has completed four or five steps to be able to reach that point, so they are recognized as the hottest.
Most of the marketers will advise you to sell something on this page, and it could be effective for some industries and niches, but it is best to include the significant link which might lead to some sort of transaction.
Surely, that’s helpful content with several social proof ( more than 120 comments) and some affiliate links directing to Aweber spread all over.
Thus, setup your confirmation thank you page and keep in mind, you are going to need the URL in the succeeding steps.
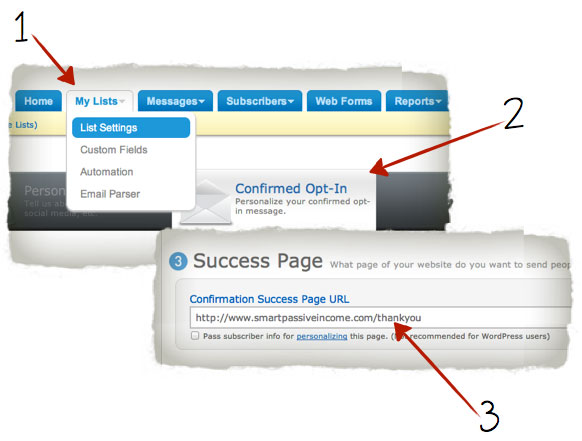
Step 2: Have your Cofirmation Thank You Page connected to your email list.
The email marketing service in this step will use a URL provided by the company, which will be used to redirect the confirmed subscribers.
In Aweber, you can add the confirmation thank you URL by trailing the direction shown below:
Step 3: Signing in to Google Analytics
It is important that you are using the latest version interface, and open the report/account for the page that you want to check. Normally, you will start on the Standard Reporting page.
Step 4: On the Upper-Right Hand Corner Click on Admin

Step 5: If you click the Profiles tab, you will see the Goals click it and then click the open +Goal
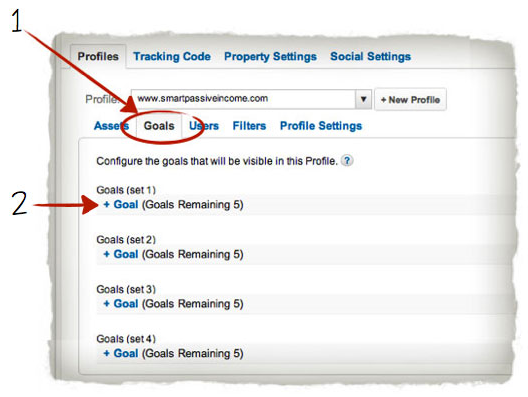
Step 6: How to Configure your Goal
- Create a name for your goal. For instance: “Subscribe to Email List”
- Set Goal Type to the assigned URL ( it will open up Step 7)
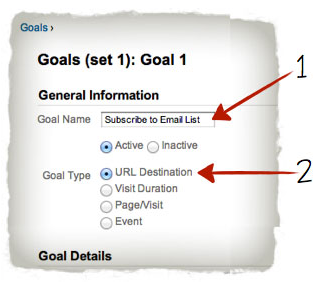
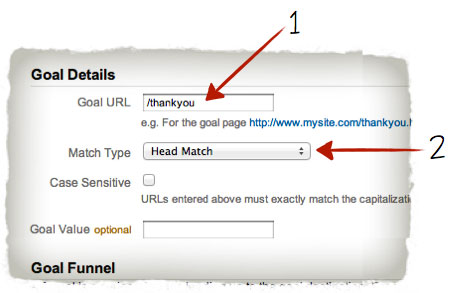
Step 7: Adding Goal URL
- When adding the URL, simply use the part after your root domain. For instance, if your thank you page is at http://www.smartpassiveincome.com/thankyou, then you will use: /thankyou
- It is not that essential, but you can use head match to make sure you are protected.
Step 8: Save
This is the stage were you have done setting up your goal. Actually, you can use this same steps to monitor other things, like product sales, or other type of funnels you prefer to create and monitor – make sure that you have a specific end point (such as your thank you page) that you can add in the Goal URL destination.
You may also choose within each specific goal, to create a funnel series (page 1, page 2 and so on …. Goal url) to determine how far people will get along in the specific process and where they plan to drop off before obtaining the goal URL.
To end the process, create widgets on the custom dashboard.
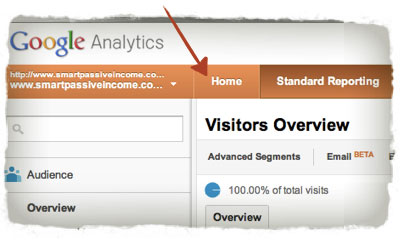
Step 9: Click the Home tab found in the Navigation Menu
A default dashboard will open that will display things such as daily visits, traffic types, average time on site, and others. You have the option to add the email tracking widgets here if you think that is appropriate, but make sure that you keep things separated and clean. Then create a blank dashboard.
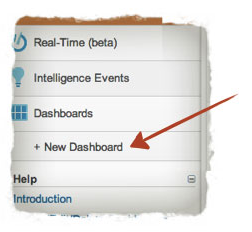
Step 10: On the left hand Menu expand Dashboards and click on + New Dashboard
Step 11: Choose Blank Canvas and Create a Name for your New Dashboard

After clicking Create Dashboard, the screen will display a Widget Settings which is a fancy tool that you can use to create any type of customizable tracking data that you prefer and add it on your dashboard so you can view it easily.
Your main concern is that it is a little bit clunky and difficult to understand at first.
Simply follow the steps below to gather the essential information that you need to make your new dashboard up and running.
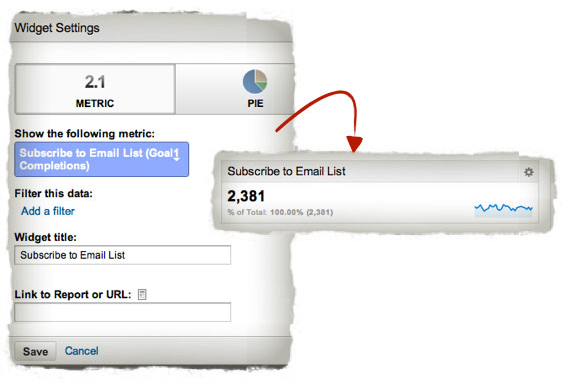
Step 12: To Track the Email Subscriptions add a Metric Widget
Choose the Metric widget and in the show the following metric you will find the “add metric.”
- Subscribe to Email List ( Goal 1 Completions )
Then, you can add a title on this widget ( for example, Total Email Subscribers) and then click SAVE.
You will be able to see a new box on the dashboard which displays the number of individuals who have signed up on your email list from the time you have started tracking – zero.
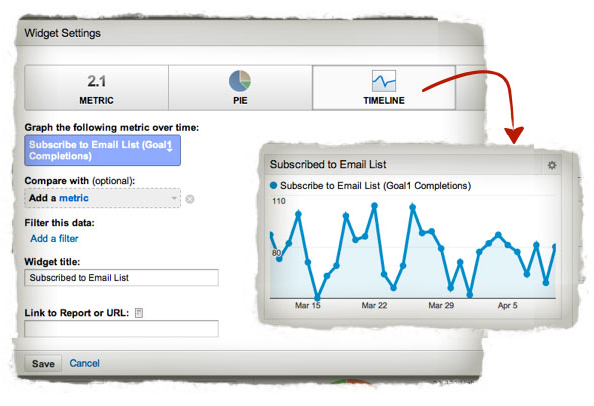
Step 13: Click the + Add Widget and then add a Timeline Widget to Track Daily Email Subscriptions
Choose the Timeline widget and in the Graph the following metric over time tab add metric:
- Subscribe to Email List (Goal 1 Completions)
Create a name for this widget (i.e. Daily Email Subscribers), and then click SAVE.
And keep in mind, as soon as you start accumulating subscribers from this point, the number in this box along with other details displayed on this dashboard are within the date range chosen at the top of Google Analytics.
Step 14: To Track Your Top Performing Pages Click on + Add Widget and add a Table Widget
Choose the Table widget and in the Display the following columns add dimension:
- Page
Add metrics to the right of page
- Subscribe to Email List ( Goal 1 Completions)
- Subscribe to Email List (Goal 1 Conversion Rate)
In order to see the maximum pages, show the table with ten rows. Create a name for the widget and then click SAVE.

You have completed the process
In case your Dashboard looks like the one below, don’t panic:
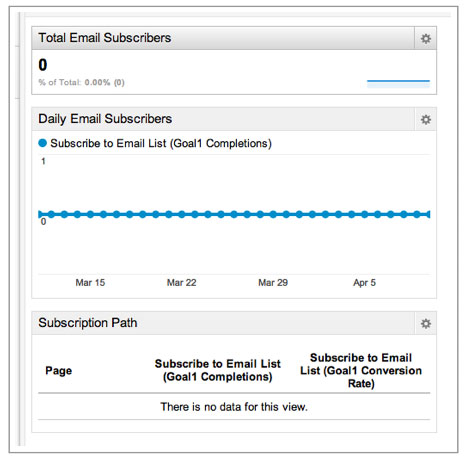
Even after two days you will start to notice data come in about your subscribers that can be used in analyzing the performance of your website and what you can do to improve it.
Simply click on the Home button each time you login to easily and check the performance fast of your conversion rates and email subscriptions.
